Solar Panel Mounts for
Vehicle Mounted Systems
80 pounds of glass/metal solar panels + highway speed winds + vehicle vibrations +
rain exposure + multiple years in UV light= potentially a very bad idea
rain exposure + multiple years in UV light= potentially a very bad idea
How to devise a solar panel mounting strategy
Each vehicle is different and finding a suitable mounting method can be difficult. Because of the open ended nature of this step, let us consider the biggest factors:
Now that you know the biggest factors involved, let's cover the top 3 most common mounting methods:
- Roof Shape: Flat or Curved?
- Roof Material: Typically steel/fiberglass/rubber/aluminum. How well is the roof material attached to the underlying layers?
- Roof Strength: If your vehicle is old or has water damage, is it safe to mount solar panels to its roof?
- Roof Rack: Can you add a rack to your vehicle to mount solar panels on?
- Solar Panel Aerodynamics: Will your solar panel act like a parachute on your vehicle or conform to its shape? Does gas mileage matter for your vehicle? (if so, you may need flexible solar panels)
- Solar Panel Cleaning: Is it easy to reach the roof? If not, do you have a way to clean the solar panels when necessary?
- Solar Panel Strength: If you are using large panels, you will need to mount it more securely so that it doesn't twist/flex and ultimately crack. If you plan to use large panels (anything larger than 200 watts), you may need to mount the solar panel to a frame so it doesn't twist/flex, or over-engineer some traditional mounting methods so that it stays put.
Now that you know the biggest factors involved, let's cover the top 3 most common mounting methods:
- Bolt-on Mounts: Use a roof rack to mount your panels. This is safest and easiest.
- VHB Industrial Grade Mounting Tape: Extremely strong! Nearly permanent mounting method for quite a few surfaces.
- Screw Mounts (Z brackets) and Lap Sealant: Least recommended but required for rubber roofs
Common Mounting Methods for Different Roof Types
To summarize it as easily as possible:
- If you have a roof rack, or you can install a roof rack, bolt the solar panels to that
- If you have a flat metal/fiberglass roof, use VHB tape mounting methods, preferably using the "drill-less corner mounts"
- If you have a rubber roof, use screw-in z-brackets and lap sealant
- If you have a curved roof, use flexible panels and VHB/eternabond tape (or find a way to put a roof rack on it, then mount panels to that)
So you have 3 methods to mount them:
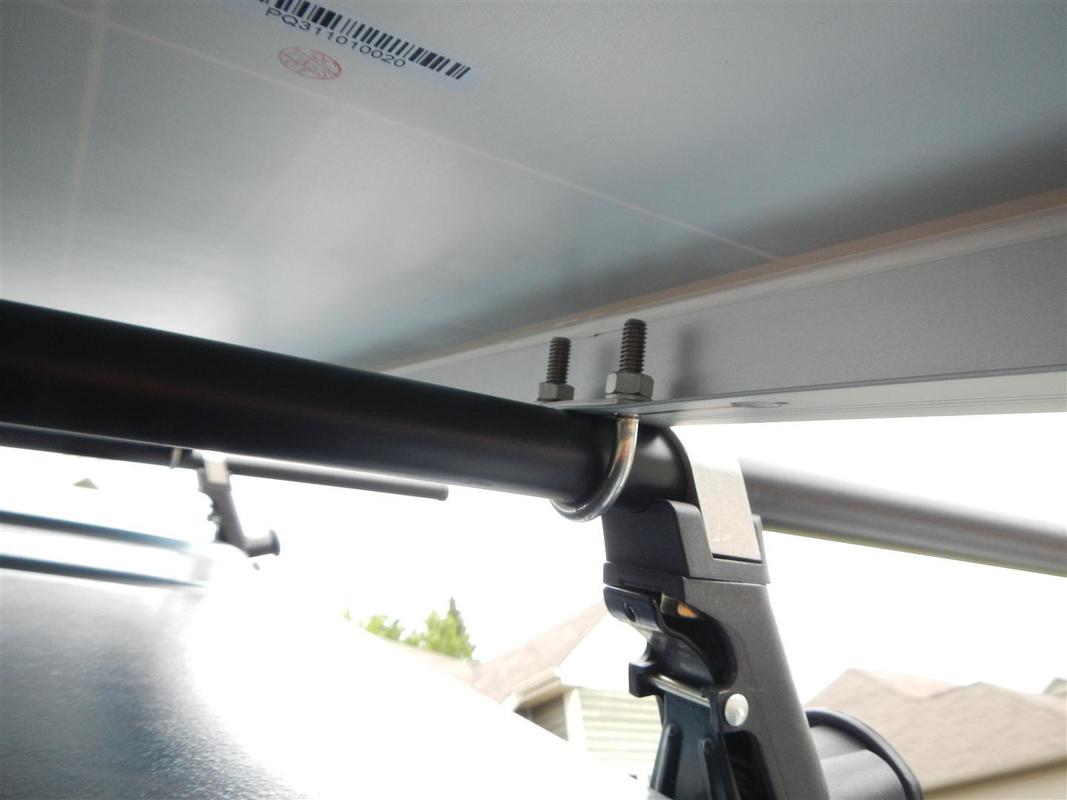
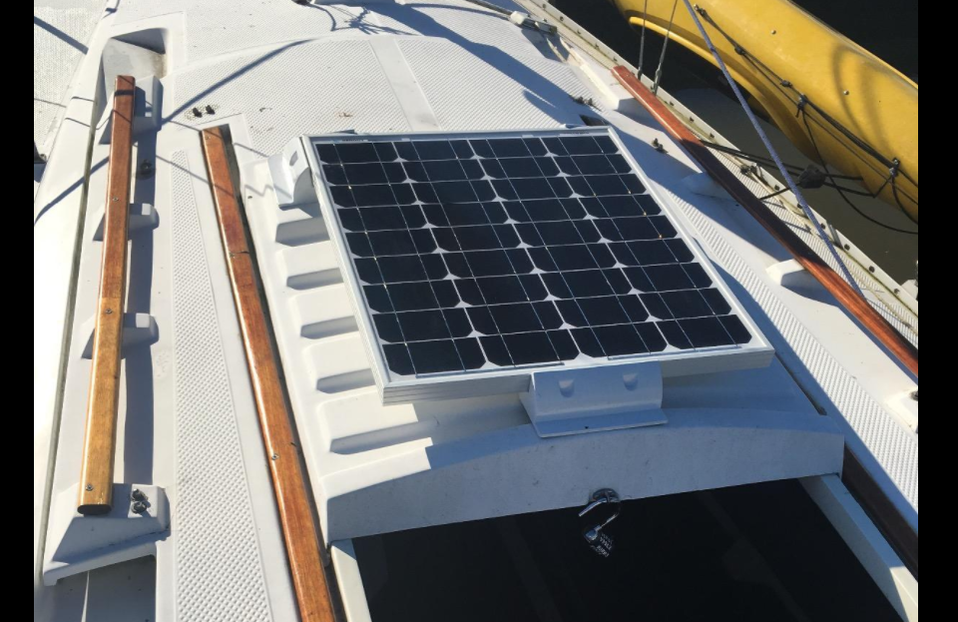
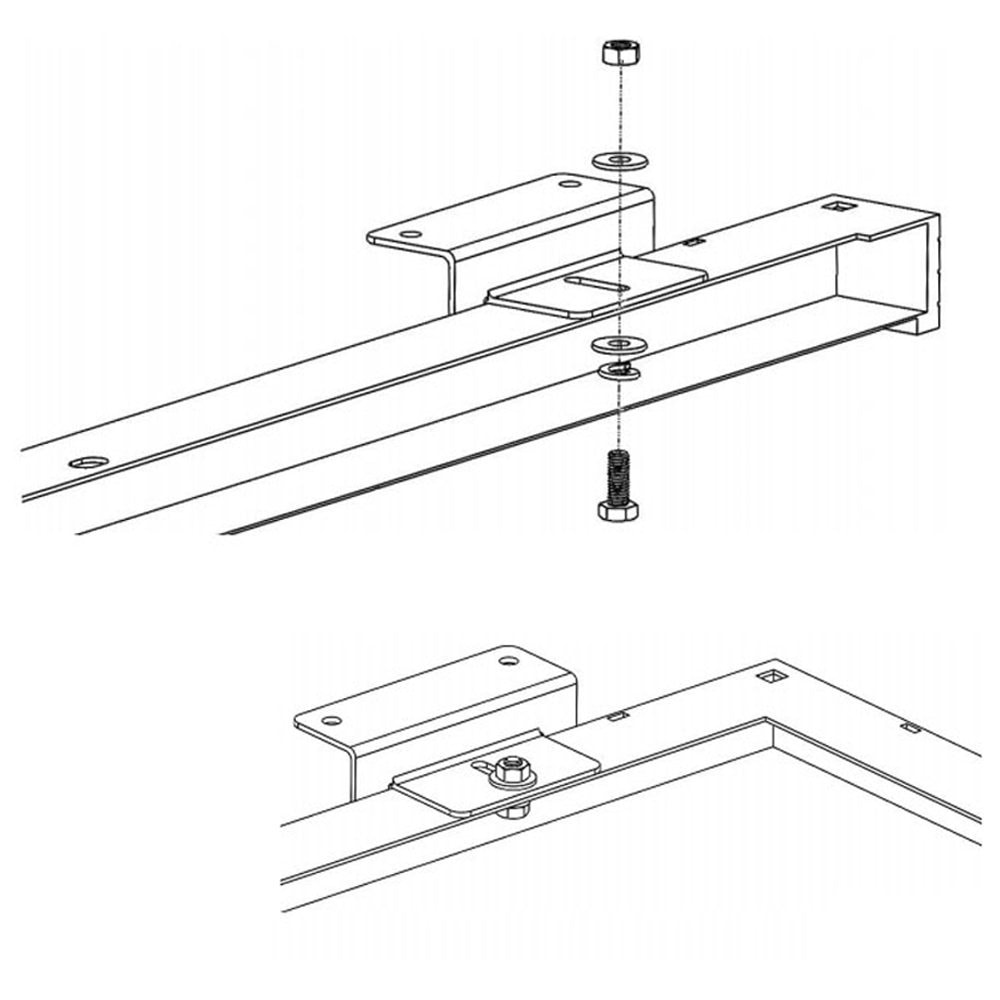
1. Bolt-on Mounts
If you have a rack on your vehicle, you can bolt your solar panels directly to it. You can use brackets to mount the solar panel to your rack, or you can bolt the solar panel frame directly to your roof rack:
|

|
|
|
|
Bolting a solar panel to a rack is nice because you can usually find all the parts you need at a local hardware store. Be sure to buy stainless steel hardware.
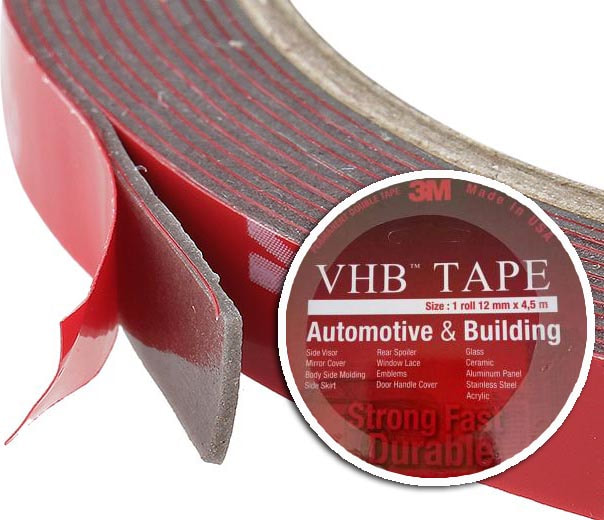
2. VHB Tape by 3M
|

|
|
This is my favorite method of mounting solar panels. This is a double sided tape that you can use with or without mounts (but the solar panels must have air flow under them).
This tape is used to keep windows on skyscrapers which means it is waterproof, handles vibrations, UV resistant for years, can handle a wide temperature range and is honestly magical. I have tried to remove panels from an aluminum roof after 4 years, and they wouldn't budge. Some trailer manufacturers use this tape instead of rivets! It is strong stuff and provides a nearly permanent bond (there is a solvent available to remove the tape, if you wish, that is sold by 3M).
The strength of this tape is dependent on the mating surfaces it attaches to, and the strength of your roof. If you prepare the mating surfaces properly, use enough tape, and have a strong roof, this stuff will last for years.
Keep in mind that this tape usually does not fail, but the roof it is attached to will fail instead.
What VHB tape works well on:
How to Mount Panels with VHB tape:
This tape is used to keep windows on skyscrapers which means it is waterproof, handles vibrations, UV resistant for years, can handle a wide temperature range and is honestly magical. I have tried to remove panels from an aluminum roof after 4 years, and they wouldn't budge. Some trailer manufacturers use this tape instead of rivets! It is strong stuff and provides a nearly permanent bond (there is a solvent available to remove the tape, if you wish, that is sold by 3M).
The strength of this tape is dependent on the mating surfaces it attaches to, and the strength of your roof. If you prepare the mating surfaces properly, use enough tape, and have a strong roof, this stuff will last for years.
Keep in mind that this tape usually does not fail, but the roof it is attached to will fail instead.
What VHB tape works well on:
- Roofs made with clean and dry: Aluminum/Fiberglass/Powder Coated Steel
- Flat Roofs (can work on curved roofs if you are creative and have small solar panels or mounts)
- Strong roofs: No water damage present, no weak or cheap paint, and hopefully does not flex much when you stand on it
How to Mount Panels with VHB tape:
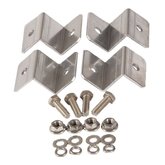
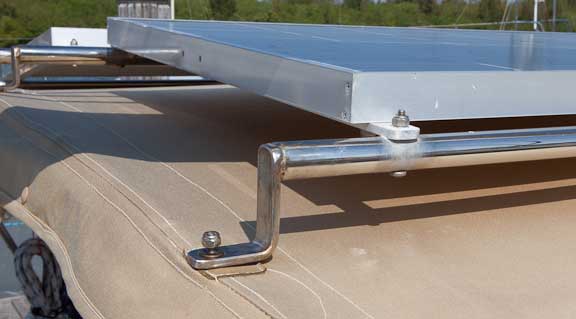
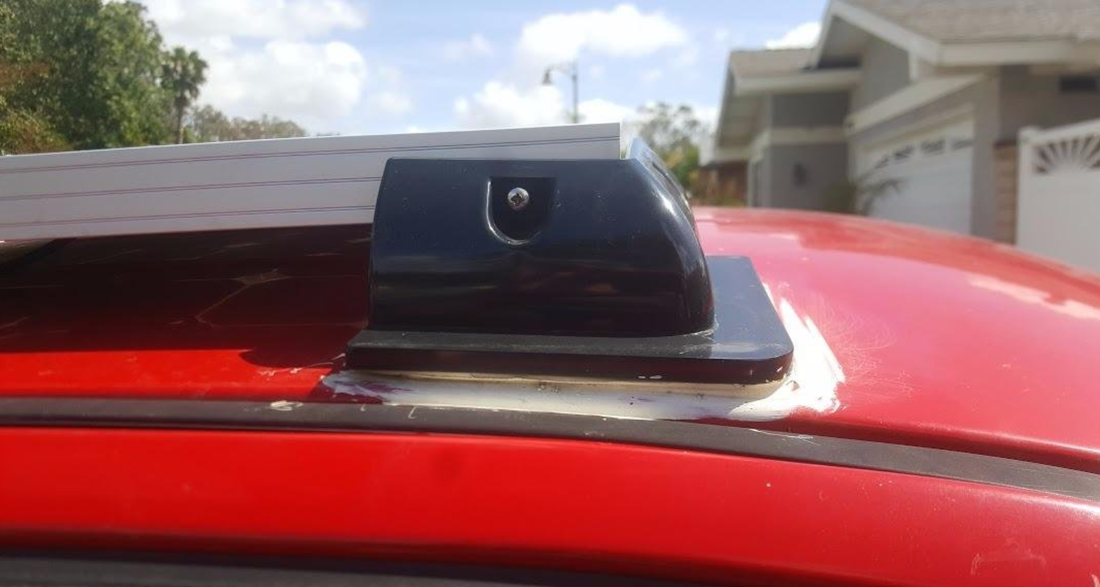
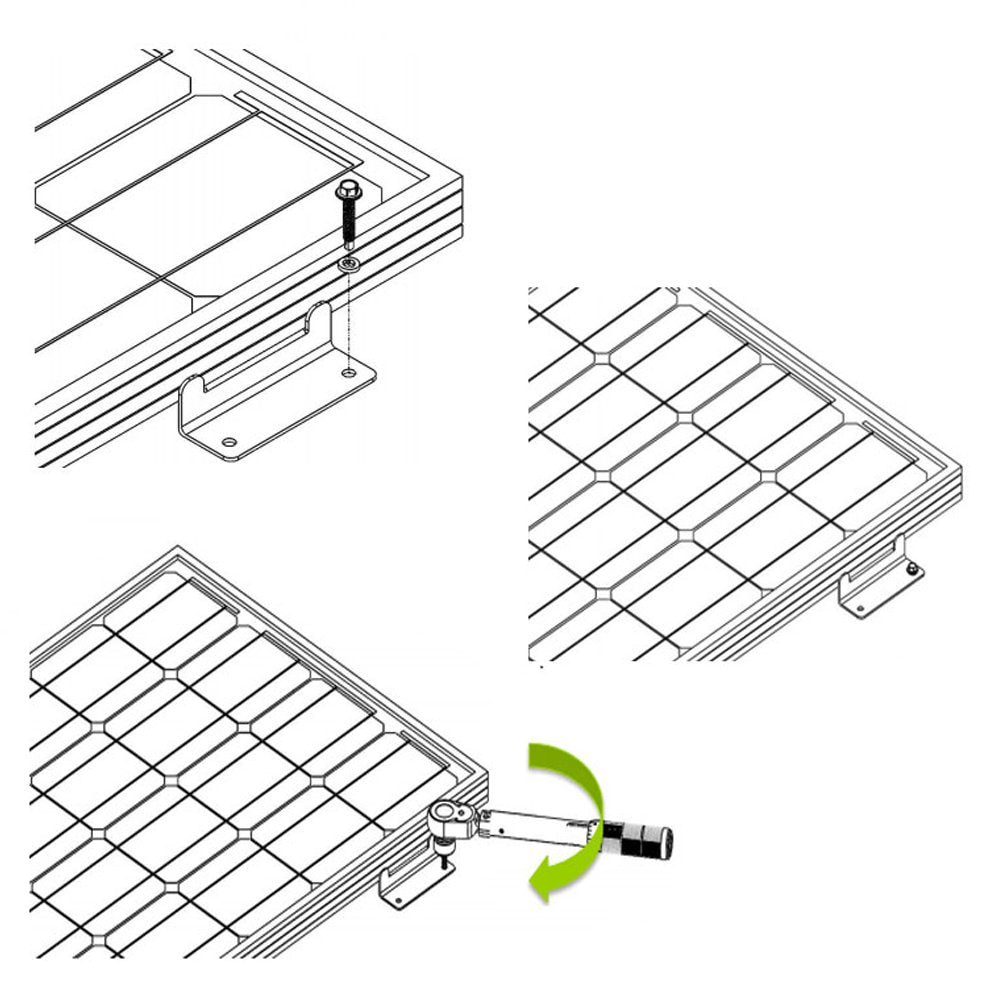
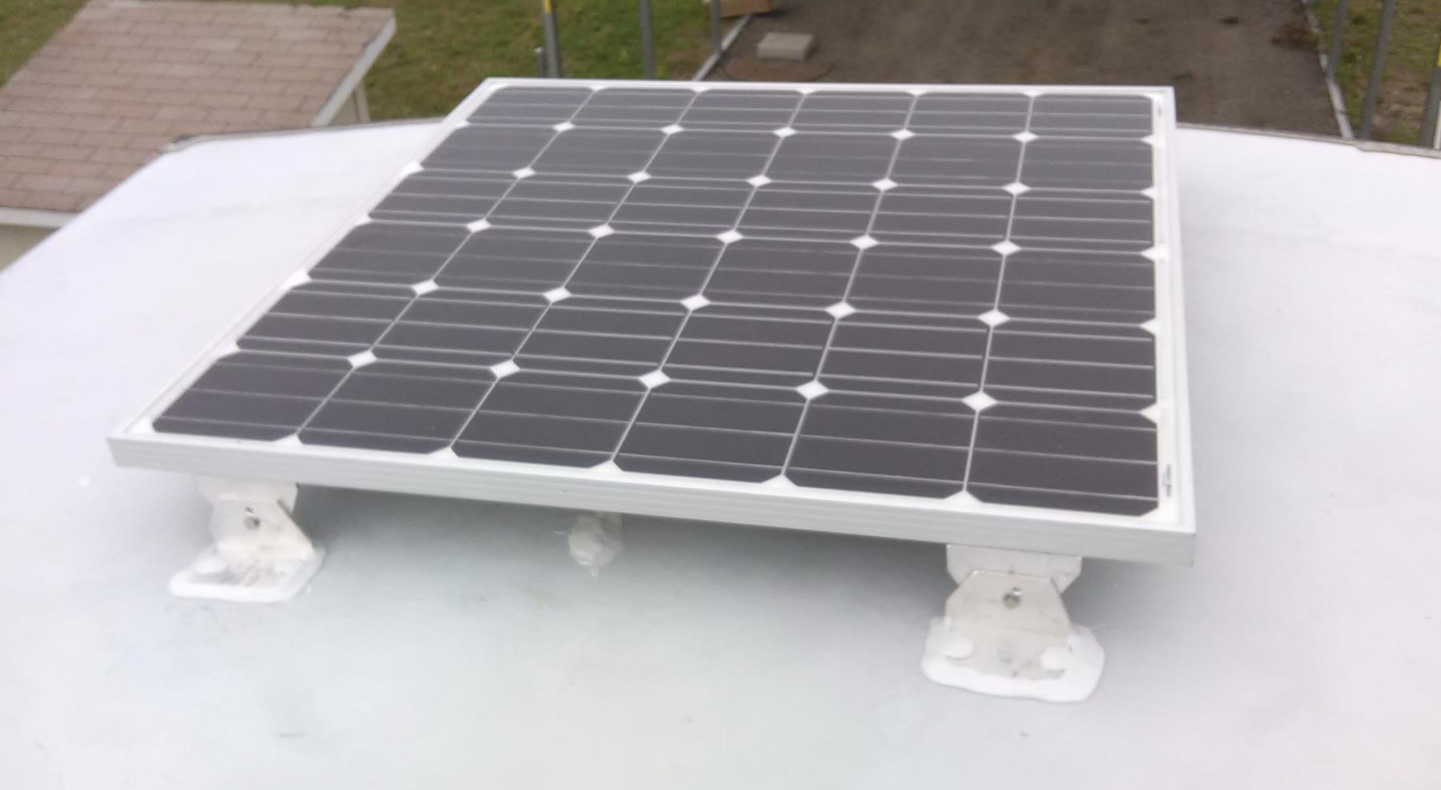
VHB Option 1, Drill-less Mounts:
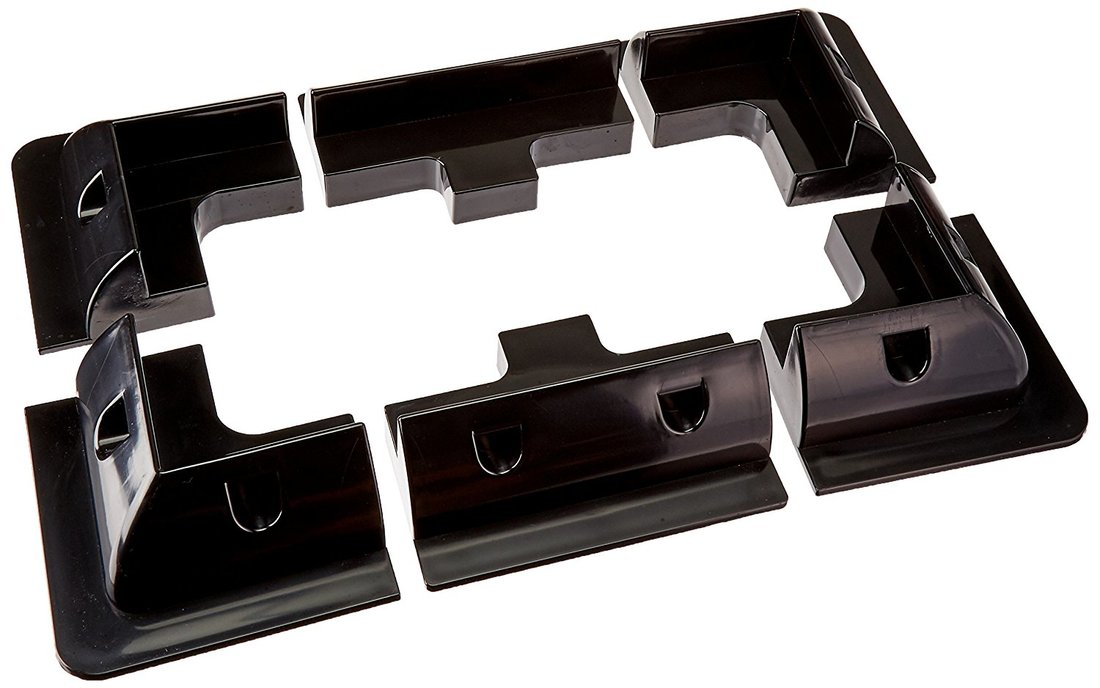
|
on a flat roof
on a curved roof
|
These mounts are really easy to use. What you will need:
(I Make A Commission For Purchases Made Through The Links Below)
Last note: Some people like to use sika flex to attach the mounts to the roof. I would not do this and I have read of stories of this failing. Stick with using VHB tape, and only use sika flex along the edge of the mount to protect the tape.
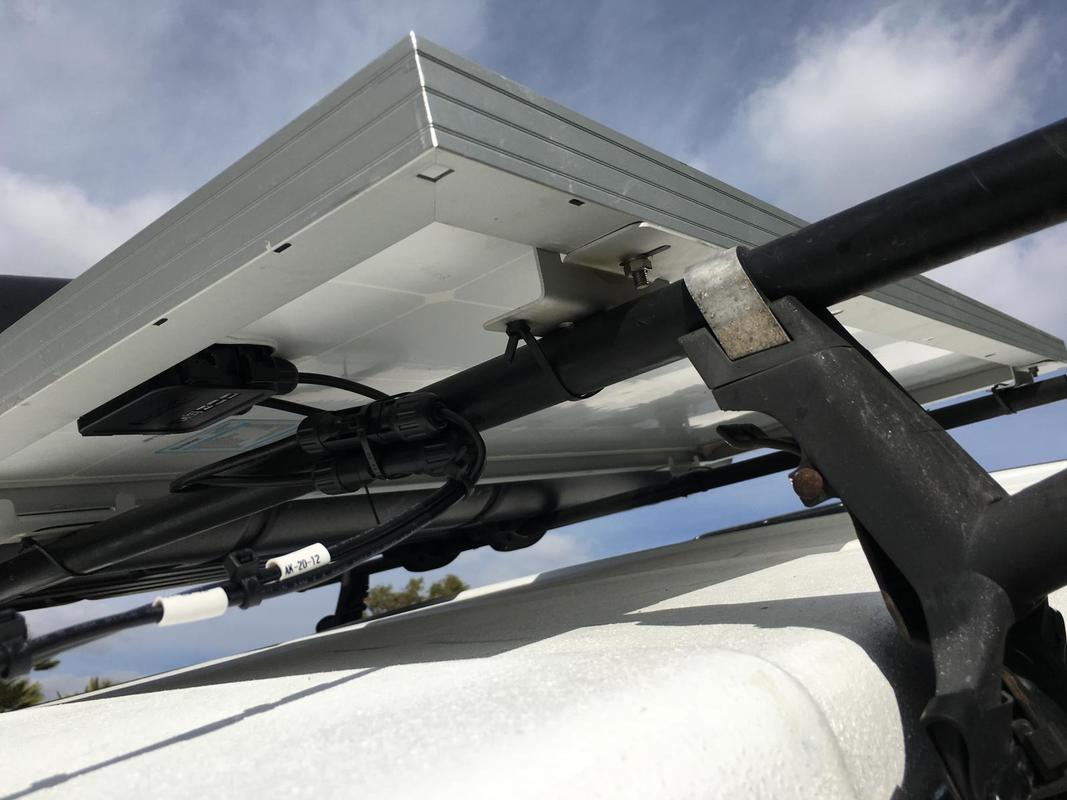
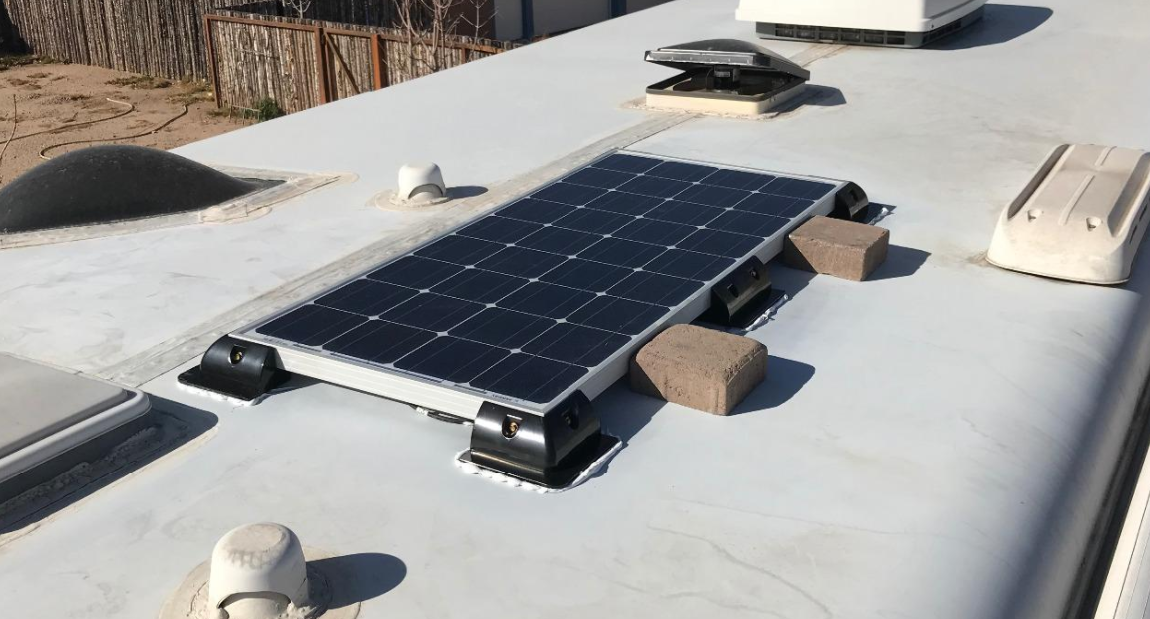
VHB Option 2, Attaching directly to the roof with VHB tape:
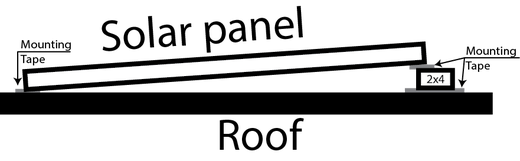
Another method to using VHB tape is to mount a long edge directly to the roof of your vehicle, and lift up the opposite edge a couple inches, and mount it to a piece of square metal tubing (so that the solar panel has air flow). This is a cheap and easy way to mount a solar panel, and it is super strong! Be sure to lift the solar panel enough so that it has ample air flow, and has enough surface area to stick to the roof. Not as good of an option as the previously mentioned drill-less mounts, but it works great!
This method is great if you have a strong flat roof, made from metal or fiberglass. Be sure to clean all mating surfaces. A final clean with rubbing alcohol is preferred.
(I Make A Commission For Purchases Made Through The Links Below)
- The Mounts (click here for a cheap price)
- Stainless Steel Self Tapping Screws or Bolts (available at local hardware store)
- VHB Tape Click here for a cheap price) or Constructive Adhesive (click here)
- Lap Sealant (click here for a cheap price) or Eternabond Tape (click here)
- Attach mounts to solar panel with Stainless Steel bolts/screws or VHB tape (be sure to clean the solar panel and mounts with rubbing alcohol before adhering them with VHB tape)
- Attach VHB to the bottom of the mounts (do not peel back the protective backing until you are ready to mount the panels). Cover the entire bottom surface with VHB tape.
- Before you lift your panels onto your roof, clean the roof with soap and water, then let it dry. Then spray rubbing alcohol to the areas you plan to mount your solar panel mounts, and allow to dry again. You can also roughen up the mating surface with a fine sand paper, but it is not required.
- Now that the roof is prepared, lift solar panels w/ mounts onto the roof of your vehicle
- Remove protective backing on the VHB tape and place the solar panels where desired. Press the panel against the roof with some force. Mildly lift the panel to ensure a strong bond. Look to see if the mating surfaces are flat, and that the mount is flush with the roof.
- Put a bead of sealant such as sika-flex or lap sealant around the mounts (to protect the tape), or use Eternabond tape.
- Wait 72 hours for a full bond.
Last note: Some people like to use sika flex to attach the mounts to the roof. I would not do this and I have read of stories of this failing. Stick with using VHB tape, and only use sika flex along the edge of the mount to protect the tape.
VHB Option 2, Attaching directly to the roof with VHB tape:
Another method to using VHB tape is to mount a long edge directly to the roof of your vehicle, and lift up the opposite edge a couple inches, and mount it to a piece of square metal tubing (so that the solar panel has air flow). This is a cheap and easy way to mount a solar panel, and it is super strong! Be sure to lift the solar panel enough so that it has ample air flow, and has enough surface area to stick to the roof. Not as good of an option as the previously mentioned drill-less mounts, but it works great!
This method is great if you have a strong flat roof, made from metal or fiberglass. Be sure to clean all mating surfaces. A final clean with rubbing alcohol is preferred.
VHB Option 3, Attach flexible panel directly to the roof with VHB tape

First I attached the solar panels together with some zip ties, and then I laid them flat on the roof and put VHB tape under the edges. Very simple and nearly indestructible (I drove these panels to 90+ mph no problem).
If you live in an extremely hot environment, you may need to lift the flexible solar panels a little bit to allow for air flow (they get hot and will fail after a year if they are flush mounted). This can be done with VHB mounting as well by inserting wooden dowels under the panel to lift the panel up a little bit, and by securing the front and rear facing edges to the roof, and having the side edges lifted slightly.
Another method of attaching flexible solar panels with an adhesive is by using eternabond tape. This stuff is crazy strong and can be used to hold the edges of the panel to the roof. Click here for a cheap price on eternabond tape
VHB Option 4, Attaching metal beams to the vehicle roof with VHB (a DIY roof rack), and then bolting the solar panels to the rack
(or bolting a rack to the roof, and using VHB to mount the solar panels on the rack)
Some roofs can be difficult, so it is best to mention all of these options! I hope this helps.
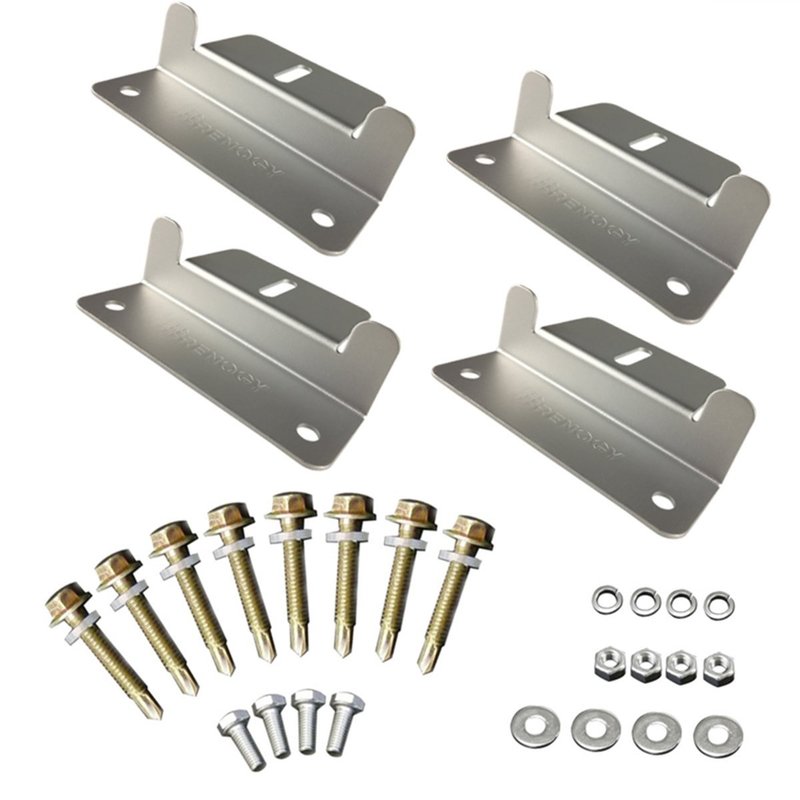
3. Screw Mounts (Z-brackets)
and Lap Sealant
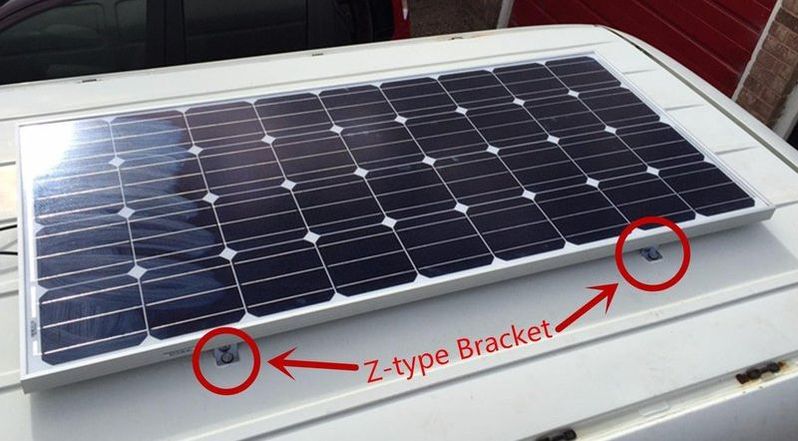
No one likes to have holes in their roof, but if you have a rubber roof, you will need some z-brackets screwed to your roof. These work really well and I have never heard of one failing. What can fail is the waterproof seal, so you need to use a proper sealant.
Screw mounts require a wood layer under the rubber to attach to (very common on RV roofs). Be sure that the plywood is strong enough to hold the solar panels. If it is a thin layer of plywood, you will need to use multiple mounting feet for each panel (instead of the recommended number of 4 mounts per panel, use 8 or more). This will increase the amount of holes that are in your roof, but you will be happy when your solar panel doesn't fly off your roof. If you have a stud finder, you can screw the mounts directly to that as well (especially useful for leading edge of panel that deals with the most wind force).
What you will need (affiliate links below):
- Z-brackets and mounting hardware kit (4-8 for each panel) Click here for a cheap price
- Self Leveling Lap Sealant (click here for a cheap price)
- Clean the roof with soap and water and let it dry (so sealant has a nice bonding surface)
- Prepare solar panels by mounting 4-8 Z-brackets to the edge of the solar panel (brackets usually come with bolts to do this. You may need to drill holes in the solar panel frame, but not always)
- Lift solar panel onto the roof of your vehicle and place solar panels where you wish
- Before you screw the brackets into the roof, put lap sealant between the roof and the bracket. Once all the mounts have lap sealant under them, you can screw the z-brackets into place. Be sure not to over tighten these brackets!
- Put a final coating of lap sealant over the entire screw and z-bracket edge
|
|
|
Picture below does not have typical z-brackets, but you can see the lap sealant that they used over the screws and on the edges of the mounts. This is what yours should look like if you use the right sealant.
Last but not least! Solar Panel Safety Line
No matter how you decide to mount your solar panels, you need a safety line. This is a strong rope that connects your solar panels to each other, and to the roof of your vehicle. It takes 20 minutes to construct, and could possibly save a life. If all the solar panels are connected to each other, the chance for catastrophic failure is reduced drastically. At worst you will have a solar panel dangling from a rope on the side of your vehicle.
But what kind of rope? This can be tough to decide because most ropes are not very UV resistant. You must use a marine grade rope or cord. A thin metal cable is preferable. I like marine grade paracord: Click here for a cheap price
But what kind of rope? This can be tough to decide because most ropes are not very UV resistant. You must use a marine grade rope or cord. A thin metal cable is preferable. I like marine grade paracord: Click here for a cheap price
Thank you for reading and I hope this helps!
Be sure to check out my book if you want full instruction on how to design or install your vehicle mounted solar power system: