
DIY LiFePo4 Solar Battery
This battery is non-combustible, cheap, lasts a really long time, has a great discharge/charge rate, works with standard 12/24 volt equipment and more! Probably the easiest way to get started with DIY lithium batteries.
This LiFePO4 battery is dirt cheap if you can find some used/cheap cells ($240.00-$500.00 for 100ah 12v battery!). If you cannot find a cheap price for them, the new cells cost a lot ($600-$700), and you are probably better off buying a battle born battery ($950): Click Here
This LiFePO4 battery is dirt cheap if you can find some used/cheap cells ($240.00-$500.00 for 100ah 12v battery!). If you cannot find a cheap price for them, the new cells cost a lot ($600-$700), and you are probably better off buying a battle born battery ($950): Click Here
12v Battery
|
|
24v battery

|
|
UPDATE: This page has a ton of useful information for intermediate level battery builders, but if you are a beginner, I highly suggest using my BMS protected systems that will prevent you from damaging your LiFePO4 cells. You can't screw it up and they are dead simple to build!
Click Here for 12v BMS Protected LiFePO4 Systems
Click Here for 24v BMS Protected LifePO4 Systems
Click Here for 12v BMS Protected LiFePO4 Systems
Click Here for 24v BMS Protected LifePO4 Systems
Before we get started: Lithium Battery Crash Course
There are 6 crucial things that you need if you plan to use a custom built lithium iron phosphate battery:
If you have any specific questions not listed on this page, I highly suggest checking out this page. It has a ton of information on DIY LiFePO4 cell batteries: Click Here
- Low Temperature Cut-off or Heating System: Lithium batteries can NOT be charged when the internal cell temperature is below 0 degrees Celsius. If it is charged below this temperature, it will be permanently damaged and will be unsafe to charge. Try to find a solar charge controller with low temperature cut-off, or build your own thermostat controlled heater pad to keep the battery warm. I am keeping my battery in my living area so it stays nice and warm during the winter. The easiest way to build a low temp cut off is to buy the victron charge controller mentioned in the parts list of this page, and buy the battery temperature sensor from victron. It costs a little bit, but it takes seconds to program and anyone can do it. This is the best way for a beginner to do this!
- MPPT Charge Controller Capable of Charge Profile Editing: Each lithium battery will require a different max charge voltage. For a 4 or 8 cell LiFePo4 battery (12v/24v) with new healthy cells, we can use the standard "sealed lead acid" setting on our solar charge controller. This will prevent charging over 14.4-14.6 volts and works great. If you want added protection, and increased longevity, charge to 13.3 volts, and set the float to 13.2 volts. (more information on this at the bottom of the page)
- Over-Discharge Protection System: If you over-discharge a lithium battery, it will change the chemistry of the battery and permanently damage it, and it will be unsafe to charge again. To ensure that this never happens, the battery should be able to disconnect itself from the loads of your system if it is discharged too low. You can build your own relay system, or simply buy a "Victron Battery Protect" (click here) and program the low voltage disconnect for your battery (more on this soon).
- High Temperature Protection: If your system will be in high temperature environment, or discharging at high c ratings that its not designed for, you will need a battery cell cooling system. For solar power systems, lithium batteries rarely need a cooling system. So typically, this is not a big deal at all. But you can add a battery cooling system if you wish.
- Bottom Balancing the Cells: This is REQUIRED when first building a LiFePO4 battery. And it is very easy to do. Slowly discharge the cells to 5-10% capacity while watching the balance of the cells. When the battery is nearly depleted, balance the cells. Then charge it back up again. Discharge again and watch the balance of the cells. If they are bottom balanced properly, they should be nearly the same voltage when nearly depleted. This will ensure that none of the cells will dip to too low of a voltage when the battery is discharged.
Bottom balancing is recommended for solar because you want your SOC to float around 50%. If you have a small battery, mismatched/used cells, chargers that only charge to 14.5 volts (and cannot be edited), you should top balance. More on this at the bottom of the page (or watch this video). - Intermittent Cell Balancing: This may or may not apply to you. If you are charging and discharging from 100% to 0% at high c ratings, your cells will go out of balance over time and you will need to balance them. Most lifepo4 packs used for solar will not go out of balance, but it is wise to check the balance every couple of months. Lately I have grown to love "active cell balancers" with my lifepo4 packs. They are super cheap (under $20), and if your packs ever do go out of balance, an active balancer will balance the cells extremely fast. Great insurance to have one! Takes seconds to install and you just leave it on your pack and forget it.
If you have any specific questions not listed on this page, I highly suggest checking out this page. It has a ton of information on DIY LiFePO4 cell batteries: Click Here
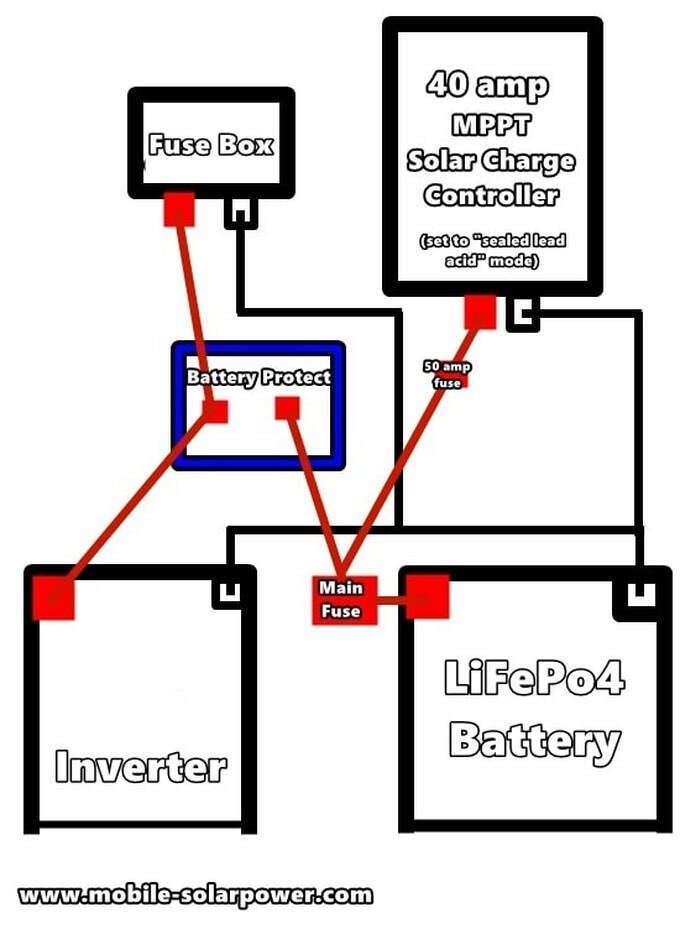
Full System Schematic:
12v/24v LiFePo4 Battery Parts List:
(I Make A Commission For Purchases Made Through The Links Below)
|
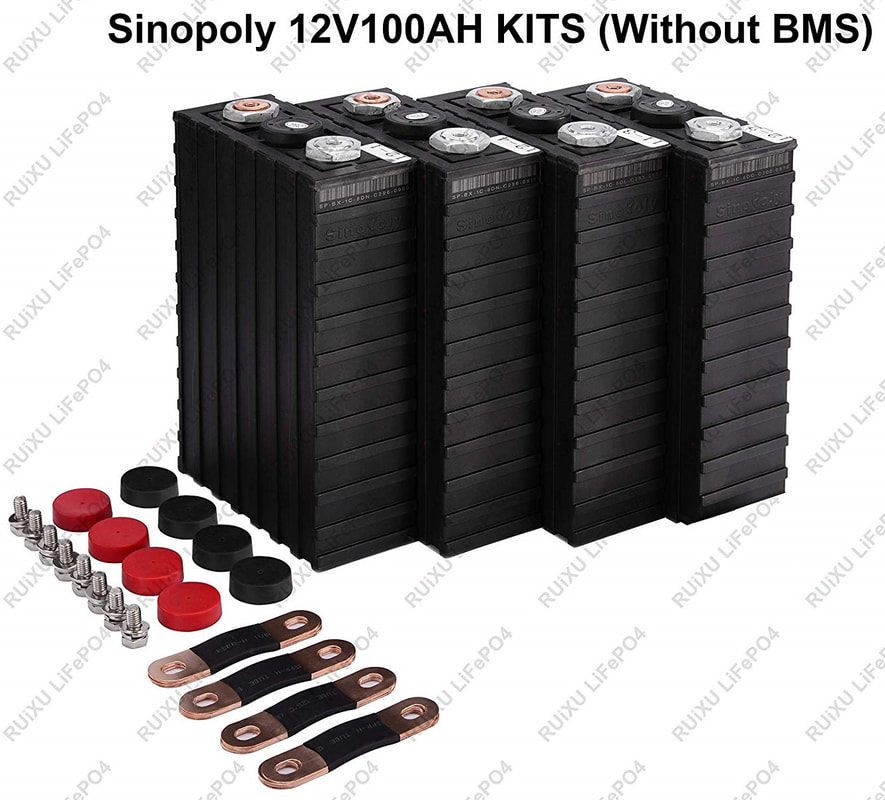
12v LiFePO Prismatic Battery Kit with 4x cells/terminal bolts/bus bars (recommended)
Seller matches cells for internal resistance and capacity, and the cells are brand new and high quality sinopoly. Highly recommend sticking to these. Cream of the crop when it comes to lifepo4 cells: -$269 for 12v 40ah Battery Kit -Click Here -$399 for 12v 60ah Battery Kit -Click Here -$599 for 12v 100ah Battery Kit -Click Here -$1,199 for 12v 200ah Battery Kit -Click Here -$1,799 for 12v 300 ah Battery Kit -Click Here |
Raw LiFePo 3.2 volt Prismatic Battery Cells
(put 4x in-series for 12.8 volts) (or put 8x in-series for 24 volt battery)
New Battery Cells:
Aliexpress (cheapest price around! but slow shipping. I buy most of my batteries from here lately):
$470 for 4 new 120ah cells, 1.5 kwh (includes shipping): Click Here
$796 for 8 new 120 ah cells, 3 kwh (includes shipping): Click Here
$1,562 for 16 new 100 ah cells, 4.8 kwh (includes shipping): Click Here
$849 for 4 new 200ah cells, 2.4 kwh (includes shipping): Click Here
Amazon.com:
$370 for 4 new 60ah cells, .76 kwh (includes shipping): Click Here
$599 for 4 new 100ah cells, 1.2 kwh (includes shipping): Click Here
$1165 for 4 new 200ah cells, 2.4kwh (includes shipping): Click Here
Battery Management/Building Supplies
- Cell Balancer and monitor for 12v/24v batteries
Click Here - 12v 4s Cell Balancer Cable (this will allow you to connect the cell balancer/monitor (above) to your battery bank)
Click Here
24v 8s Cell Balancer Cable
Click Here
- Copper Bus Bars
I go to home depot, buy a 1/2 or 5/8 inch copper pipe from the plumbing section, smash it flat with a hammer till it is a nice flat strip, drill some holes then cut it to fit on the battery. It is preferred to buy battery cells that come with bus bars that fit your specific cell. They are hard to find otherwise and you will need to make your own. - Low Voltage Disconnect Protection:
Victron Battery Protect- Click Here
- Cold Temperature Protection Heat Pad: 12 volt thermostatically controlled black water tank heater pad. This will automatically heat up the battery if the battery gets too cold (I do not have one on mine because I live in san diego). This heat pad will turn on at 45 degrees F, and shut off at 68 degrees F, so to ensure that this heater pad does not waste any power, be sure to insulate the battery compartment and area around the battery. If it is insulated nicely, this pad will work well. If the battery is next to a lot of metal, such as an outdoor battery compartment that is vented, you will need to find another type of heater pad that turns on at a lower temperature. Click Here
Easy to Program Solar Charge Controller

|
After months of building these batteries, I highly recommend spending the extra money for a Victron controller. It has low temp charging disconnect built in and it takes literally seconds to program custom charge profiles. I always found that programming cheap controllers was the most frustrating part of building these custom lifepo4 batteries. Here is what I recommend below. More controller options for larger systems or higher voltage packs can be found by clicking here.
100 volt max input, 12/24 volt Battery Bank Compatible Solar Charge Controllers: 15 amp controller Max Solar Array: up to 220 watts with a 12 volt battery, 440 watts at 24 volts click here to purchase 20 amp controller Max Solar Array: up to 290 watts at 12 volts, 580 watts at 24 volts click here to purchase 30 amp controller Max Solar Array: up to 440 watts at 12 volts, 880 watts at 24 volts click here to purchase 50 amp controller Max Solar Array: up to 700 watts at 12 volts, 1400 watts at 24 volts click here to purchase |
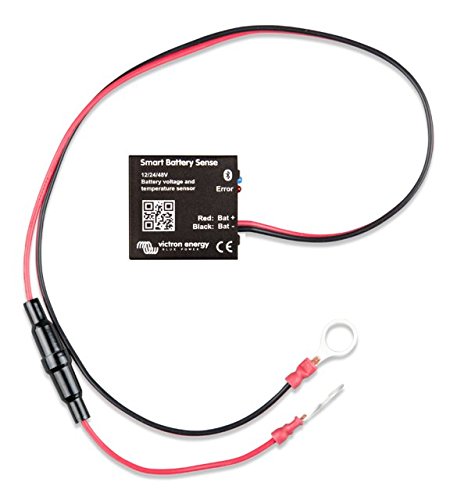
Low temperature disconnect sensor for victron controllers
|
This small sensor is a bit over-priced in my opinion, but when combined with a victron controller, you will have the easiest and most dependable low temperature cut-off system around. Just connect it to your battery, then program the controllers low temp cut off for 5 degree celcius. Takes seconds and your battery will not charge if it is too cold.
There are other ways to do this, but they are a pain in the butt. I have tried programming this with other controllers, or using relay systems, and they are a pain in the butt. Lots of work and tinkering. Spend the extra money for the victron setup and you will be setup in minutes. The bad reviews for this temp sensor on amazon are from people mounting their controller too far from their battery. Just make sure your battery and controller are a couple feet away from each other so that they can communicate. The only thing I had trouble with when setting this sensor up is connecting it to my phone. Other victron products connect instantly, but with this little guy, I had to use the password "000000" to get it to connect and update the firmware. After that I was good to go. Just set up a network for your mppt and you are set. Click here to purchase the temp sensor |
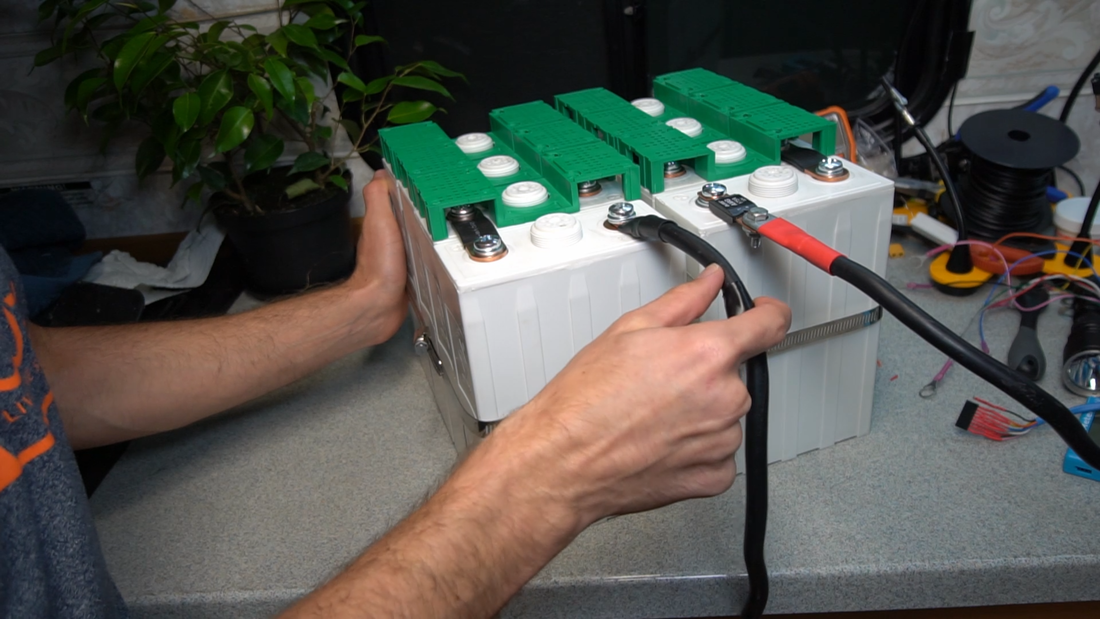
Step-by-step 12v/24v LiFePO4 Build Instructions:
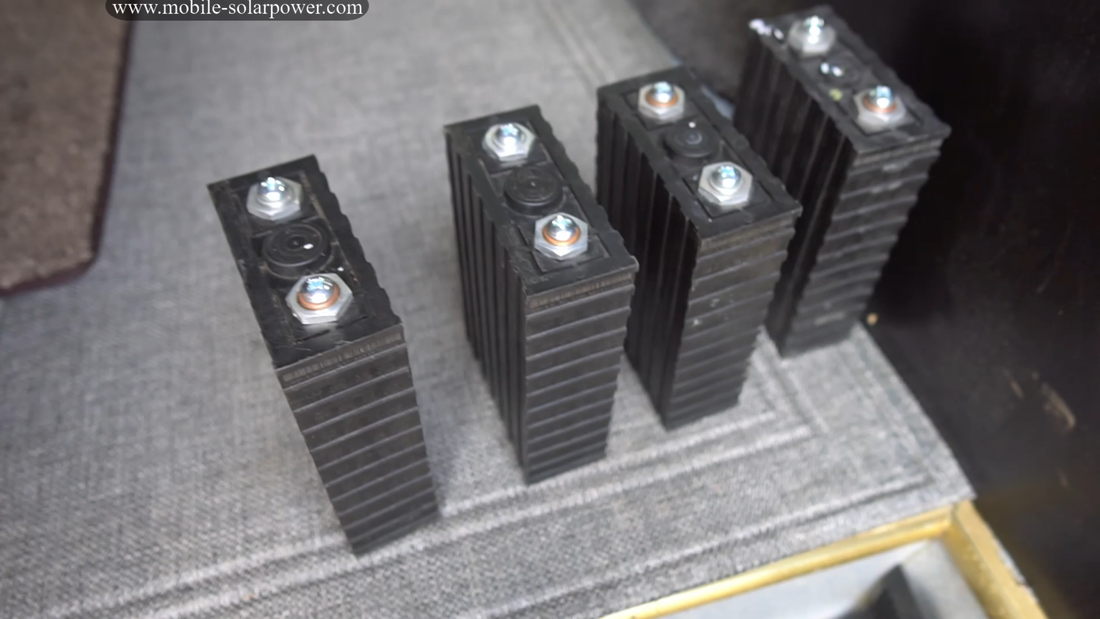
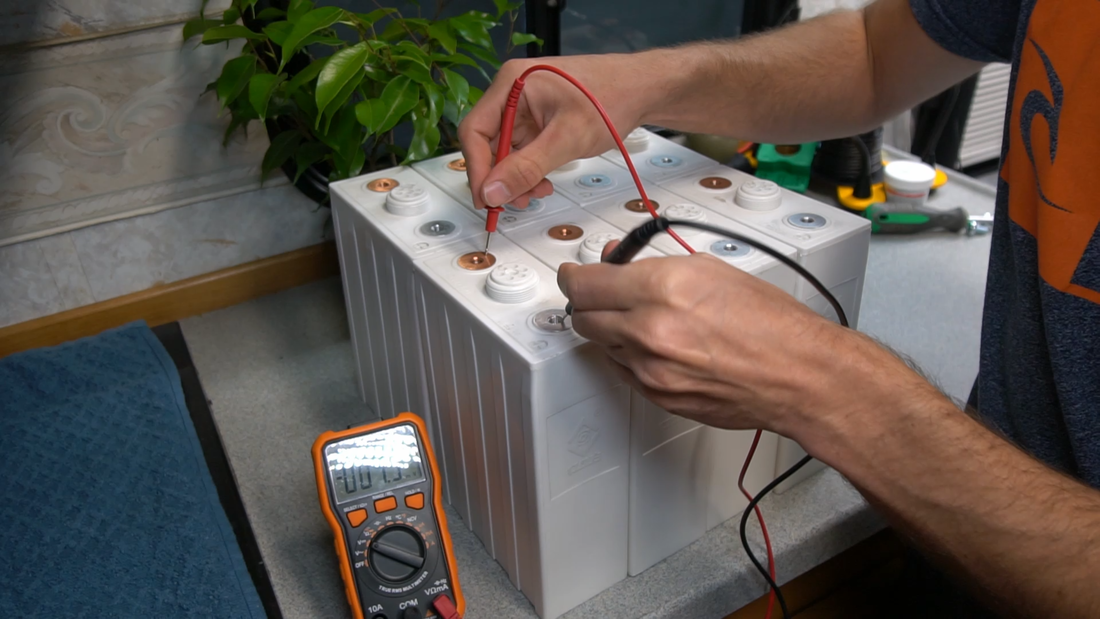
Step 1: Check cells for damage from shipping and check their voltage.
|
|
Step 2: Equalize the voltage of the cells. This will "balance" the cells so that they are the same voltage. Use this guide to determine how to equalize your cells:
- If you check the voltage and the cells are identical or within .05 volts of each other, you can skip equalization. Go to step 3.
- If the cells have a similar voltage, but they are a little bit different (within .2 volts of each other), you can safely parallel connect them to equalize the voltages.
- If the cells have a large voltage difference (more than .2 of a volt), you should not parallel connect, and instead discharge the higher voltage cell with a 25-50 watt, 2.7 ohm resistor. Just attach the leads of the resistor to the individual higher voltage cell, and wait till it is at a voltage that is closer to the other cells. When they are within .3 volts of each other, then you can connect them in parallel and allow them to equalize.
And this is how you connect the battery cells in parallel. Be sure to allow them to equalize for a few hours to a day (if the guide above says its safe to do so):
|
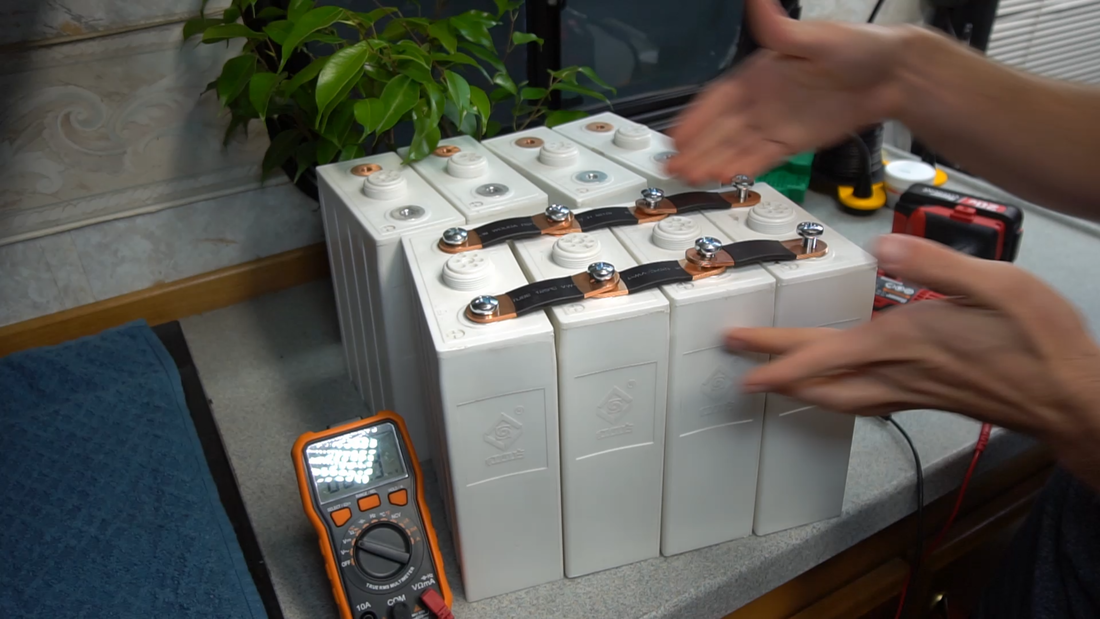
|
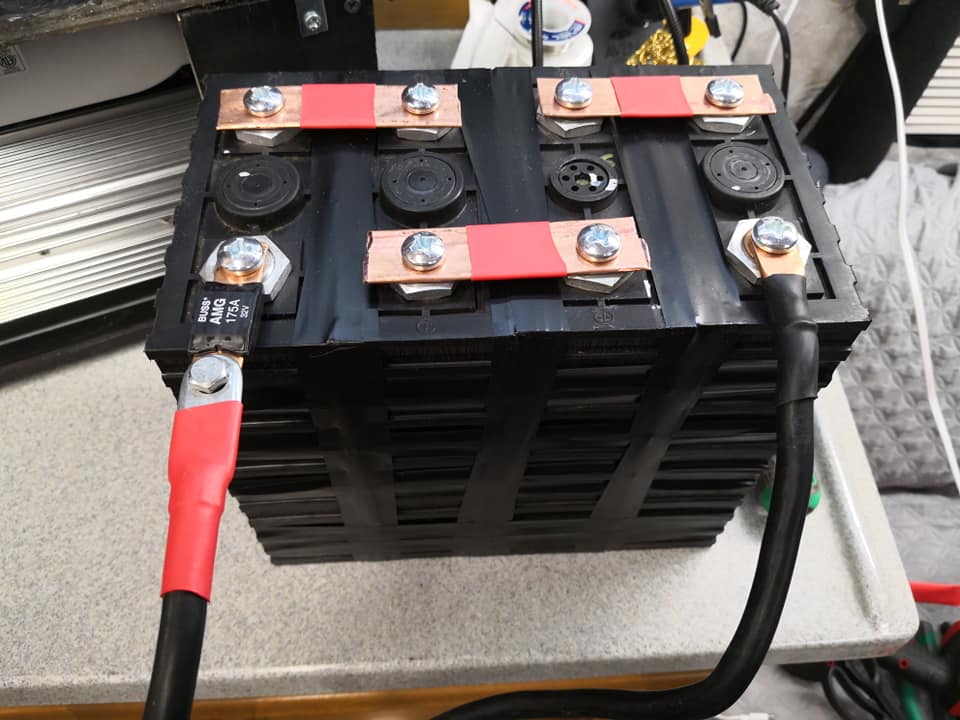
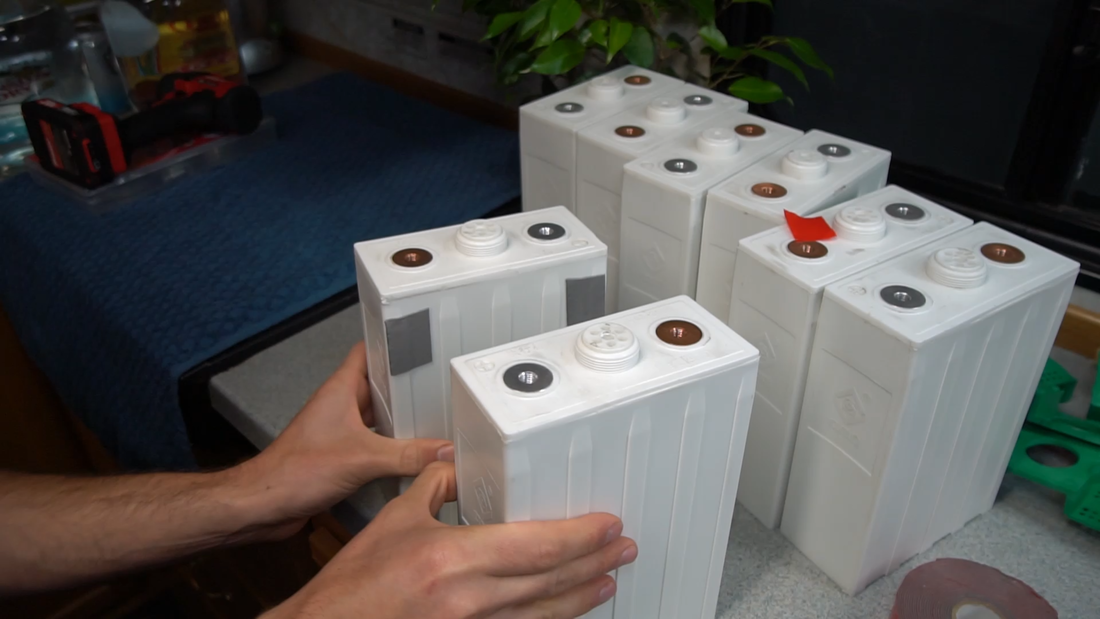
Step 3: Use electrical tape/vhb tape/hose clamps to attach the cells to each other like this. You want them arranged so that they can be series connected. What this means is the positive of one cell is close to the negative of the cell next to it. You can see the "-" and "+" markings. They are also different colors. You can see the electrical tape is going vertical and horizontal:
electrical tape |
VHB tape |
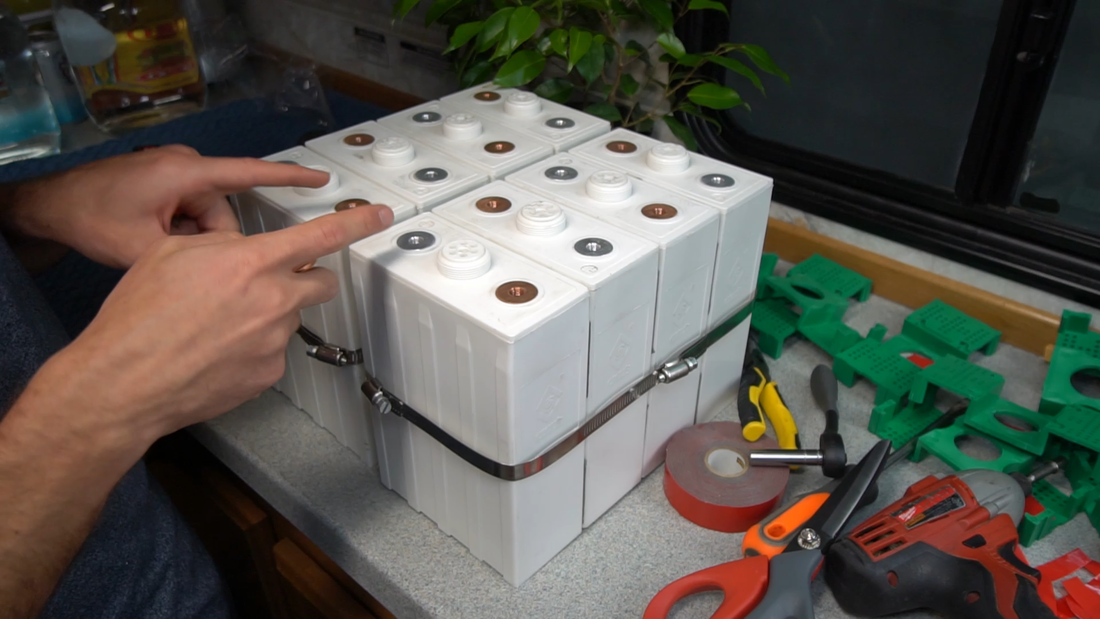
Hose Clamps |
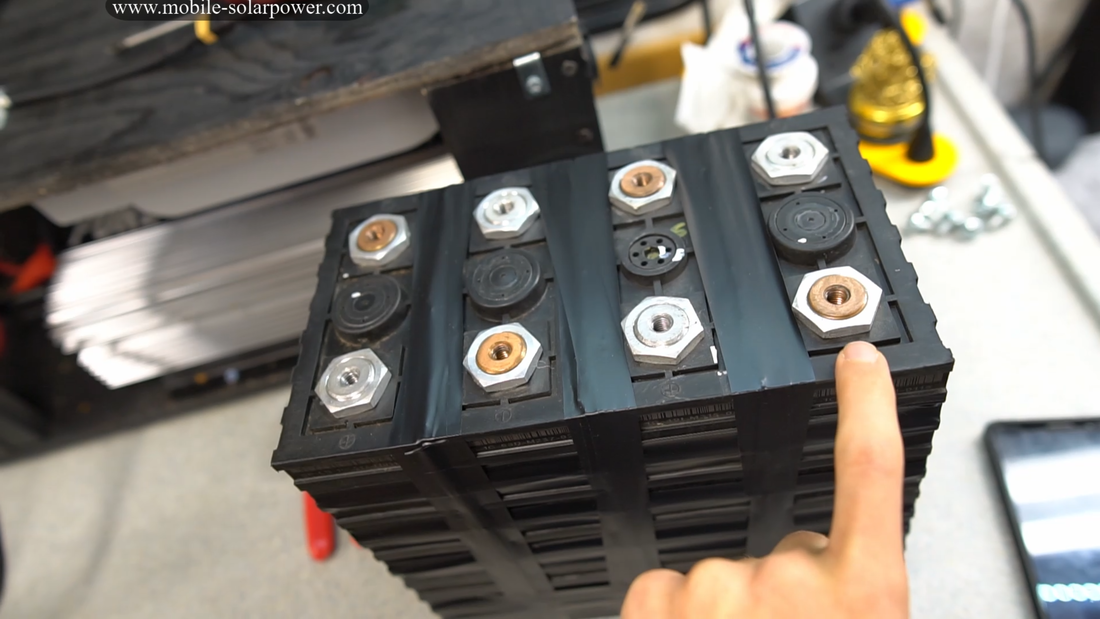
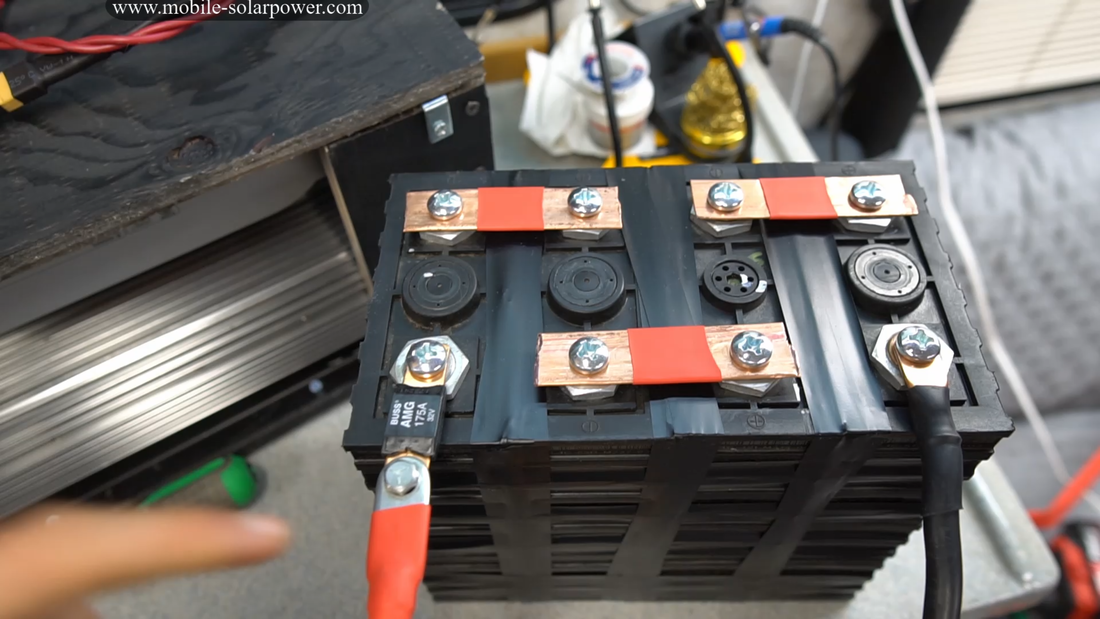
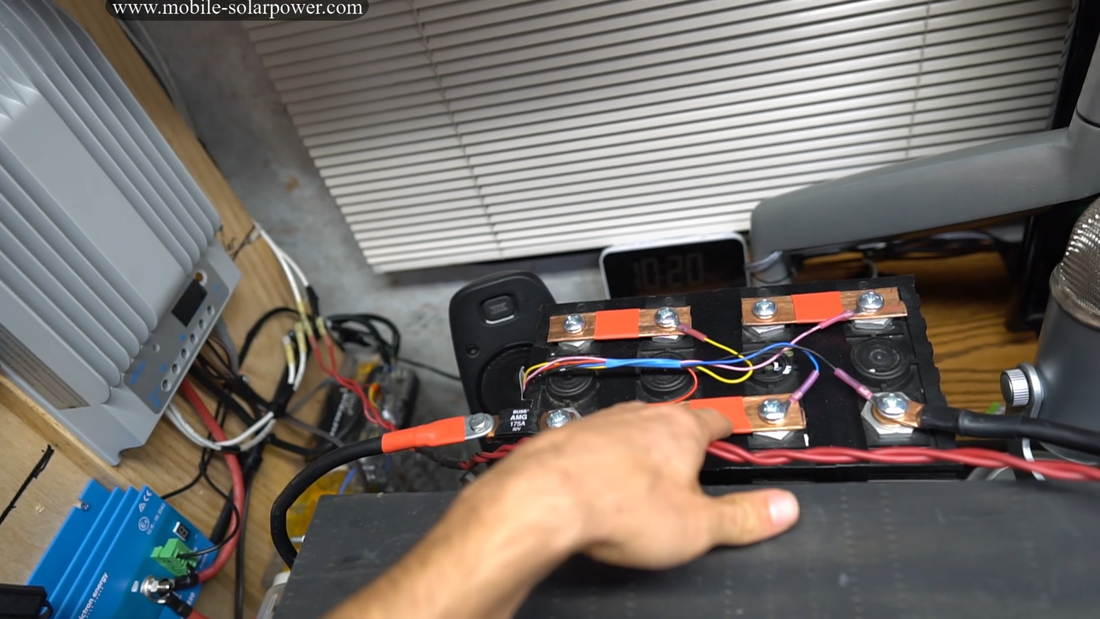
Step 4: Now install some bus bars to series connect the cells. I used 1/2 inch copper pipe smashed flat with a hammer and cut/drilled. It takes minutes to build bus bars for cheap, or you can buy them online. Connect the negative terminal of the first cell, to the positive terminal of the second cell, and so on:
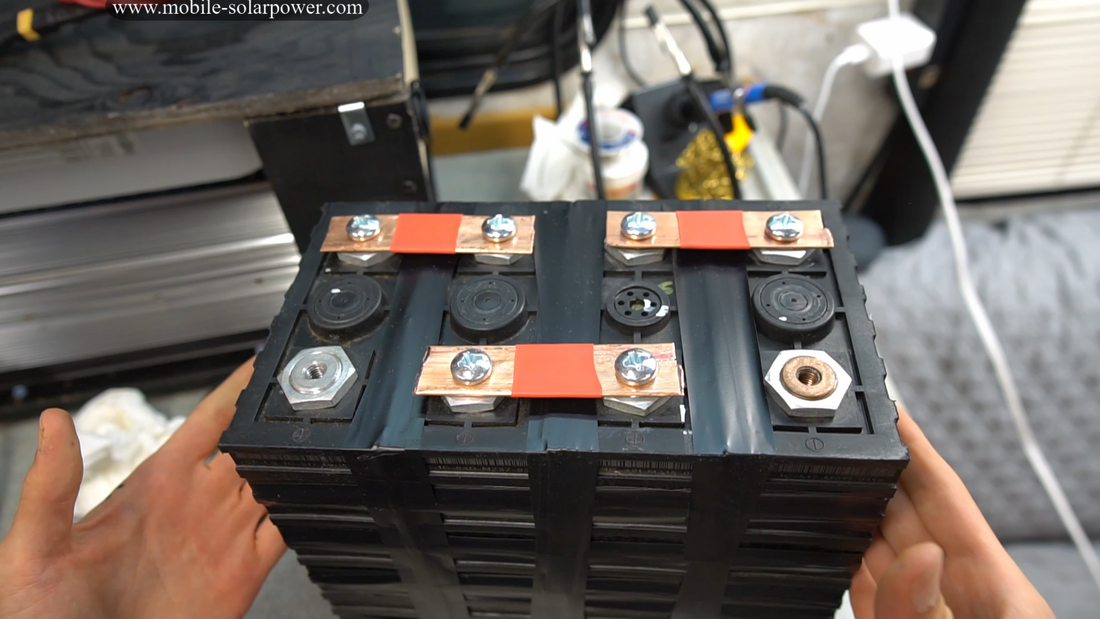
Or you can buy the bus bars from a battery distributor:
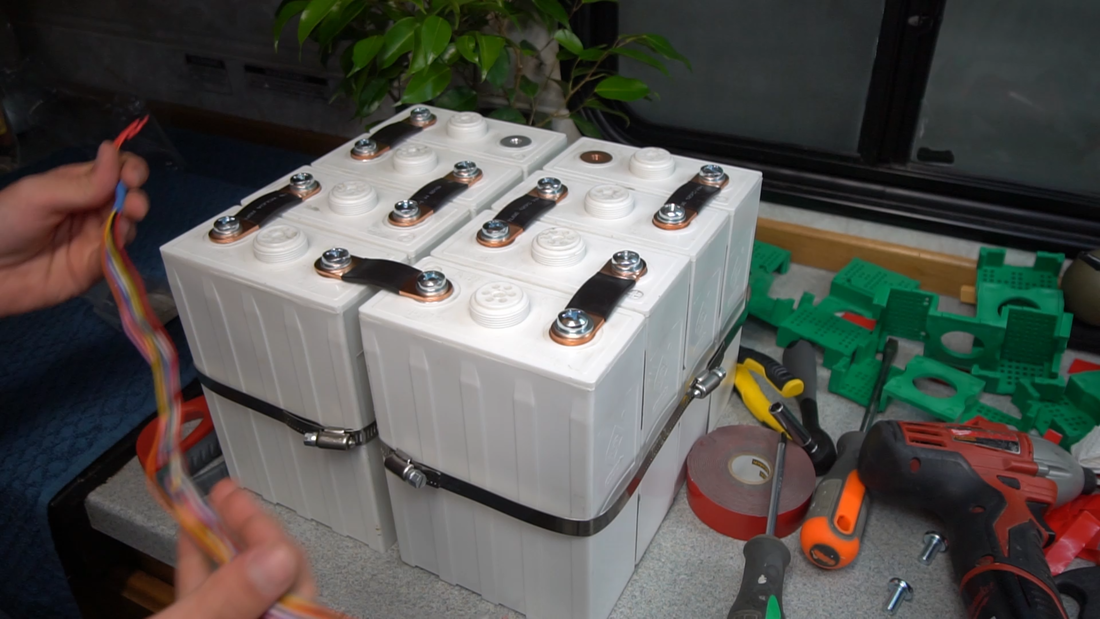
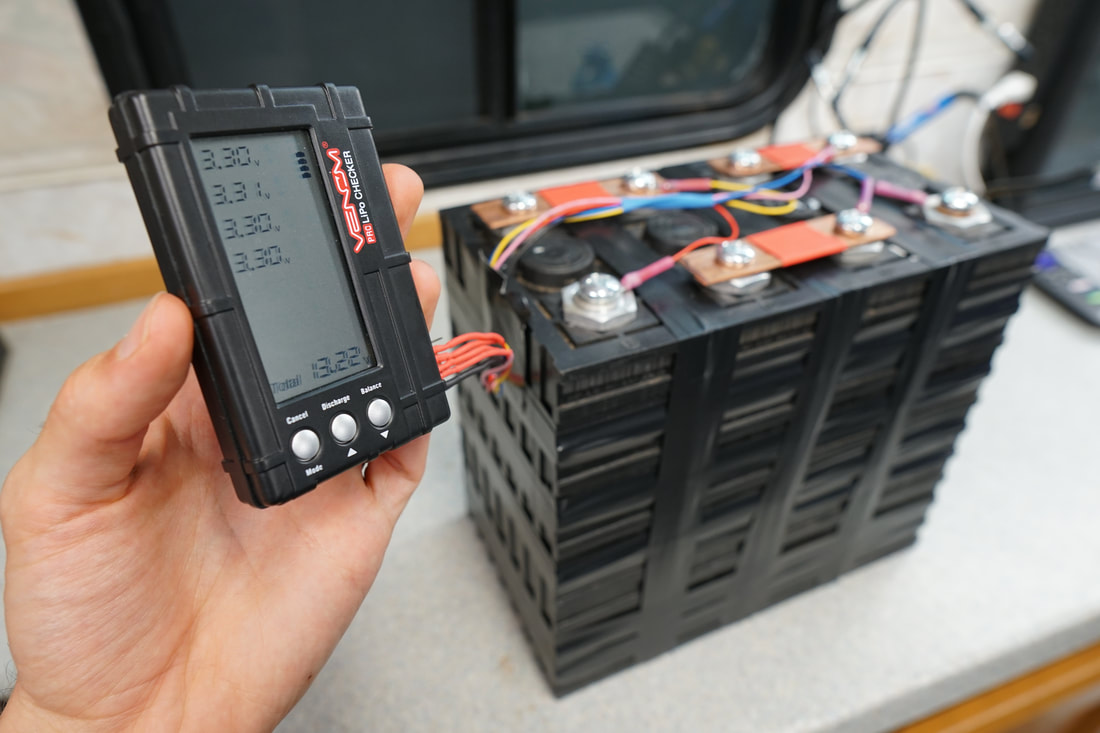
Step 5: Add a cell balancer (or active balancer). Use the balance lead mentioned in the parts list of this page and connect it to the battery terminals with crimp connectors. You will have 5 wires on the balance lead that you need to connect to your battery terminals. The colors of these wires does not matter, but they need to be in order and start with the negative terminal of the first cell (the first cell is whatever cell you will use as the "main" negative terminal). Every balance lead will have a black wire, and this is where you will start your connection. The black lead of the balance plug will connect to the negative terminal of the first cell. Use the schematic and list below for the rest of the cells:
- The negative terminal of the first cell
- The positive terminal of the first cell
- The positive terminal of the second cell
- the positive terminal of the third cell
- the positive terminal of the fourth cell
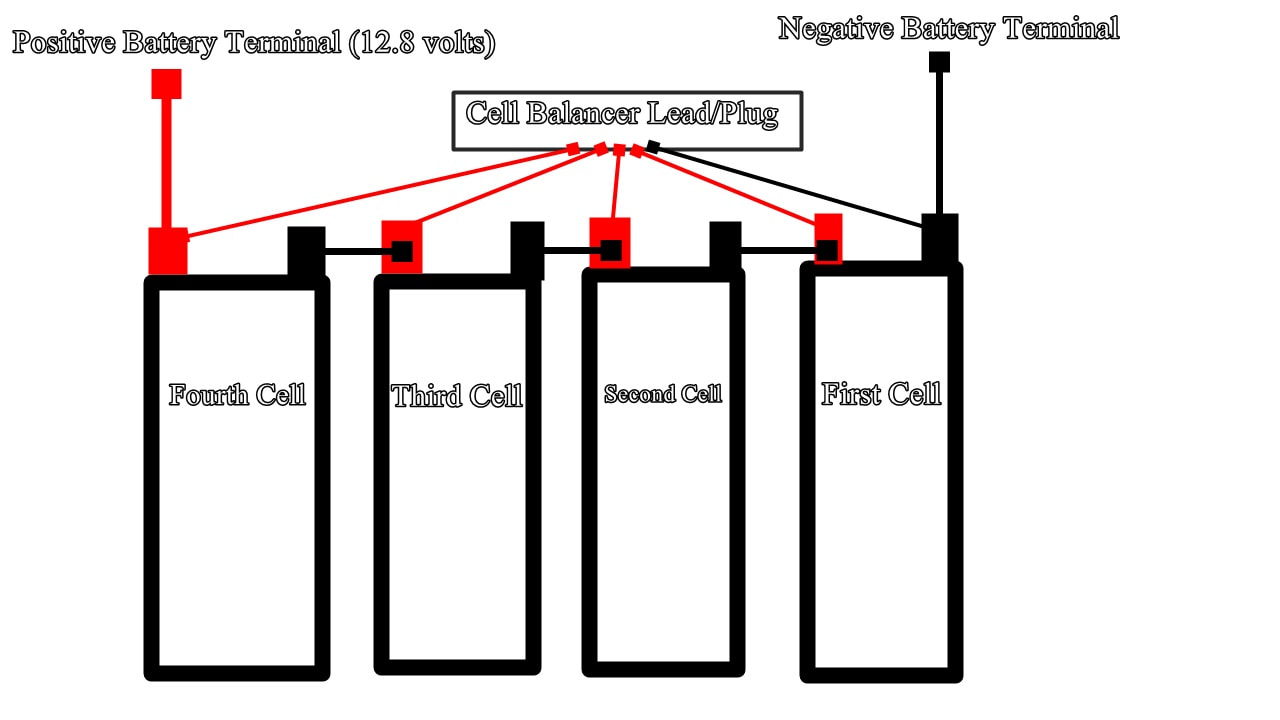

24 volt battery is same arrangement, but with 8 cells instead of 4 cells
Step 6: Balance the cells
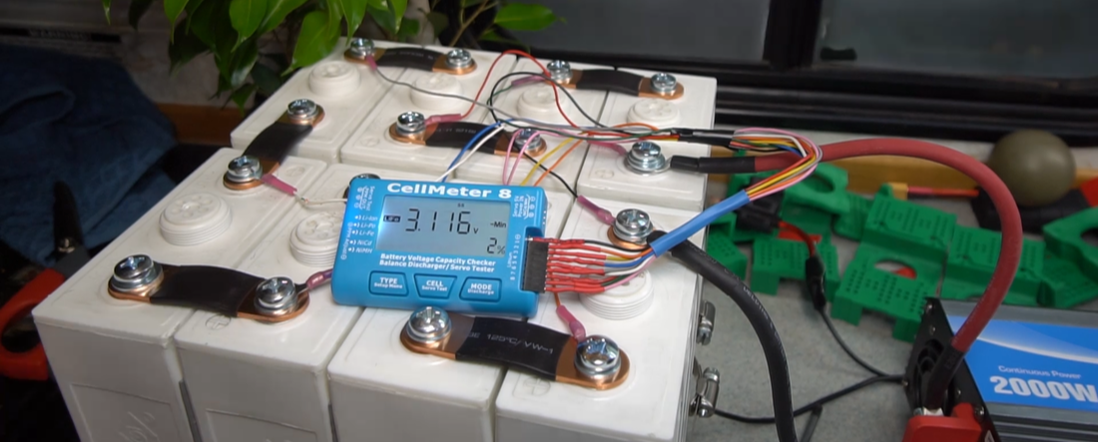
In the picture below, you can see that the cells are out of balance (each cell is a different voltage).
Press and hold the "balance button" to put the cell balancer into balance mode.
The balancer will now start to warm up to balance the cells. This can take a few hours to do:
In the picture below, you can see that the cells are out of balance (each cell is a different voltage).
Press and hold the "balance button" to put the cell balancer into balance mode.
The balancer will now start to warm up to balance the cells. This can take a few hours to do:

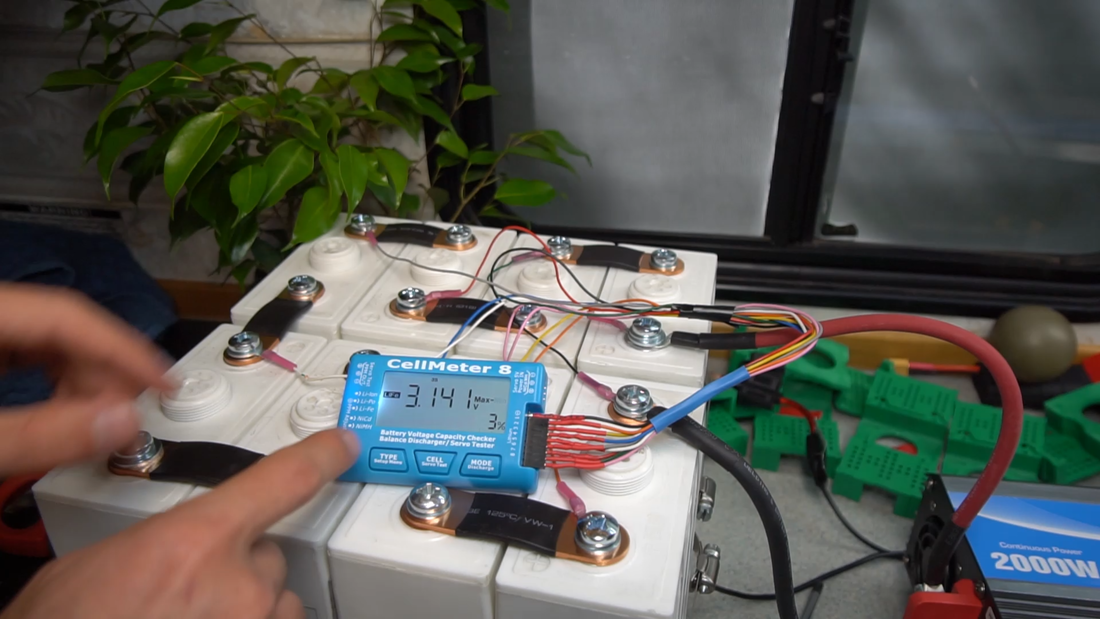
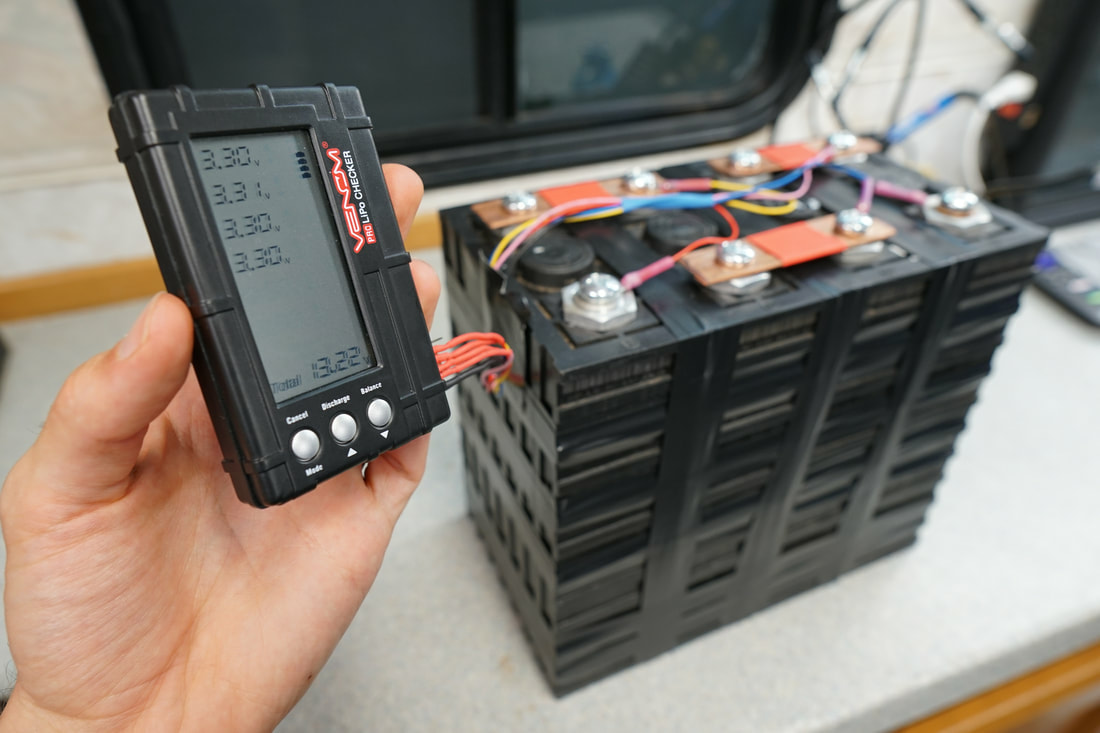
And this is what the balancer will look like when the cells are balanced.
They should be the same voltage, or very close to it:
They should be the same voltage, or very close to it:
Step 7: Bottom Balancing the Cells- Very important! We have balanced the cells at their current state of charge, but we need to balance them when they are at a low state of charge. This will ensure that the cells charge and discharge in a safe and healthy fashion. If one of the cells is out of balance, you will see it when the battery is low. So we need to balance the battery when its nearly depleted.
Step 7: Use your battery! Attach a solar charge controller to it, or an inverter, and test it out. Check the balance of the cells while it is discharging and charging. Use a low voltage disconnect, like a battery protect, to ensure that the batteries are never depleted past their lowest rated voltage.
If you charge up your battery after doing a bottom balance and one of your cells is at a higher voltage than the others, you may have a bad cell. You will need to either decrease the charging voltage limit or you should swap that cell for one that is matched to your current cells. If you buy your cells from a good seller (used or new), they should match them at the time of purchase.
For the first few charge cycles, watch the balance of your cells! This is when problems occur. You need to make sure that the voltage of the cells is within .05 volts of each other.
- Slowly discharge the cells to 5-10% capacity while watching the balance of the cells. (12-12.3 volts for a 12 volt battery, and 24-24.6 volts for a 24 volt battery)
- When the battery is nearly depleted (be careful to not deplete the battery too much!), balance the cells with your cell balancer.
- Put entire battery on a charger and charge up to 14.4. Check the cell voltages while charging. Make sure they stay within .05 volts of each other.
- Discharge the battery again and watch the balance of the cells. If they are bottom balanced properly, they should be nearly the same voltage when the battery as a whole is nearly depleted. This will ensure that none of the cells will dip to too low of a voltage when the battery is discharged.
Step 7: Use your battery! Attach a solar charge controller to it, or an inverter, and test it out. Check the balance of the cells while it is discharging and charging. Use a low voltage disconnect, like a battery protect, to ensure that the batteries are never depleted past their lowest rated voltage.
If you charge up your battery after doing a bottom balance and one of your cells is at a higher voltage than the others, you may have a bad cell. You will need to either decrease the charging voltage limit or you should swap that cell for one that is matched to your current cells. If you buy your cells from a good seller (used or new), they should match them at the time of purchase.
For the first few charge cycles, watch the balance of your cells! This is when problems occur. You need to make sure that the voltage of the cells is within .05 volts of each other.
|
|
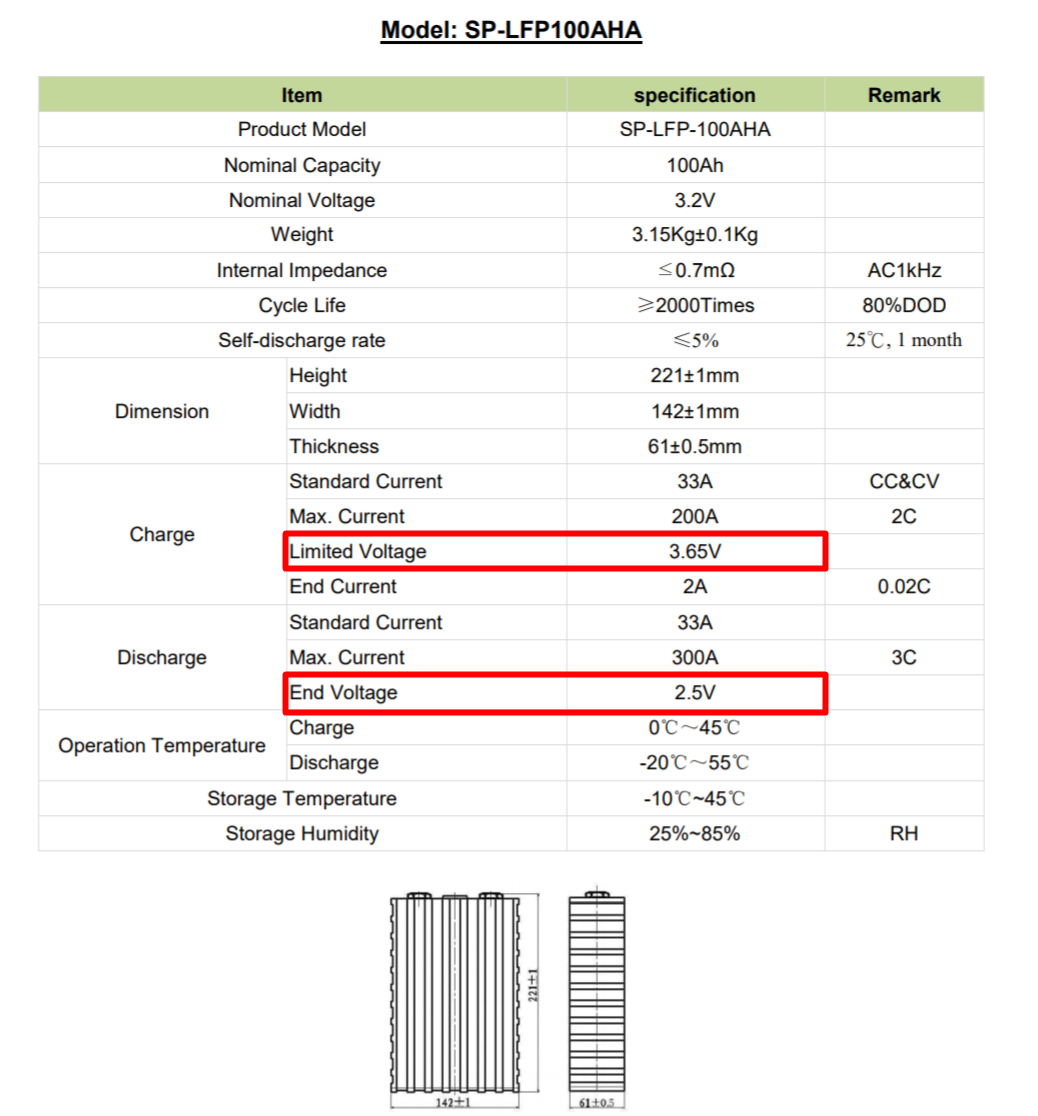
How to use a battery data sheet to determine
charge and discharge Limits
|
How to find the charge profile and low voltage disconnect for any battery:
|
|
My Recommended Charge Profile Parameters
that will work with all LiFePO4 batteries (highly recommended)
My Updated Charge Profile for LiFePO4:
Recommended Discharge Profile:
If you are using your LiFePO4 battery for solar application only, and the cells came from a good seller, you will not need to balance for years. But you need to keep an eye on the balance. If the cells charge and discharge together nicely, charging from 0%-100% is possible. I like to stay on the safe side though, and charge between 10%-90% (and use an active balancer).
If you have used/mismatched cells that go out of balance:
When cells are not matched by internal resistance and capacity (which should be done by the seller at time of purchase), the cells will go out of balance easily. If you are using used cells that are not matched by the seller, what you need to do is charge and discharge between 20% and 80% and use an active balancer/BMS. This will prevent over charging or discharging individual cells on accident. It will be important to watch the cell voltage at high and low states of charge to ensure that none of the cells are different than the others.
- Charge Limit Voltage (Absorption):
14.2 volts for 12 volt battery, 28.4 volts for 24 volt battery - Float Voltage:
13.5 volts for 12 volt battery, 27 volts for 24 volt battery - Set Equalize Time to: Disabled or 0
- Set Temperature Compensation Coefficient to: 0 (usually its -3)
- Low temp cut-off: 5 degrees C
Recommended Discharge Profile:
- Use a battery protect by Victron Energy and set it to option "8", which will disconnect at your loads at 12 volts for 12v batteries, and 24 volts for 24v batteries. That's it! Be sure to bottom balance your cells at the cut off voltage so that the battery protect can do its job. If you do not bottom balance and you use a battery protect, one of the cells may be out of balance and damage itself.
If you are using your LiFePO4 battery for solar application only, and the cells came from a good seller, you will not need to balance for years. But you need to keep an eye on the balance. If the cells charge and discharge together nicely, charging from 0%-100% is possible. I like to stay on the safe side though, and charge between 10%-90% (and use an active balancer).
If you have used/mismatched cells that go out of balance:
When cells are not matched by internal resistance and capacity (which should be done by the seller at time of purchase), the cells will go out of balance easily. If you are using used cells that are not matched by the seller, what you need to do is charge and discharge between 20% and 80% and use an active balancer/BMS. This will prevent over charging or discharging individual cells on accident. It will be important to watch the cell voltage at high and low states of charge to ensure that none of the cells are different than the others.
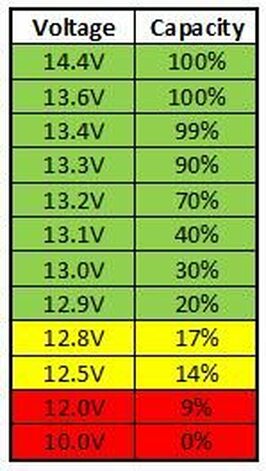
LiFePO4 State of Charge, Voltage Chartlifepo4 has a strange charge/discharge curve, and it can be very difficult to estimate what the current capacity is based on voltage alone.
Understand that if you wish to use the voltage chart to the right, you need to disconnect all loads/chargers that are connected to the battery for an accurate estimation of capacity. You may need to let the cells rest for a few hours and then check the voltage to determine the state of charge. If you need a battery capacity monitor, check out what I recommend by clicking here |
|